Overview
Build a minimal Chrome extension from scratch to understand core concepts before introducing modern tooling. This lesson covers manifest configuration, popup creation, background scripts, and debugging - the foundational knowledge you’ll use throughout the course.
By the end, you’ll have a working extension that detects tab changes and displays a popup interface.
What You’ll Learn
- Create and configure
manifest.jsonfor extension metadata - Build a popup interface with HTML
- Implement background scripts for event monitoring
- Request and understand extension permissions
- Debug extensions using Chrome DevTools
- Identify limitations of vanilla extension development
Understanding Manifest.json
Every Chrome extension requires a manifest.json file - the configuration that tells Chrome about your extension’s capabilities, permissions, and structure.
Extension Documentation
Chrome provides comprehensive documentation at developer.chrome.com/docs/extensions. Bookmark this - you’ll reference it frequently throughout development.
Creating Your First Manifest
Create a new project folder and add manifest.json:
// manifest.json
{
  "manifest_version": 3,
  "name": "TabNotes",
  "version": "1.0.0",
  "description": "A simple Chrome extension with a popup",
  "action": {
    "default_popup": "popup.html"
  },
  "permissions": []
}
Key Fields Explained:
manifest_version: 3- Chrome’s current extension format (required as of 2024)name- Display name shown in chrome://extensionsversion- Semantic versioning for updates (1.0.0, 1.0.1, etc.)action.default_popup- HTML file shown when extension icon is clickedpermissions- Array of requested capabilities (empty for now)
Why Manifest V3? Chrome deprecated Manifest V2 in 2023. V3 offers improved security, performance, and privacy - all modern extensions must use V3.
Creating the Popup Interface
The popup is the UI users see when clicking your extension icon. Create a basic HTML file:
<!-- popup.html -->
<!DOCTYPE html>
<html>
<head>
  <meta charset="utf-8">
  <title>TabNotes Popup</title>
</head>
<body>
  <h1>TabNotes</h1>
</body>
</html>
This minimal popup establishes the structure we’ll expand in later lessons.
Loading Your Extension
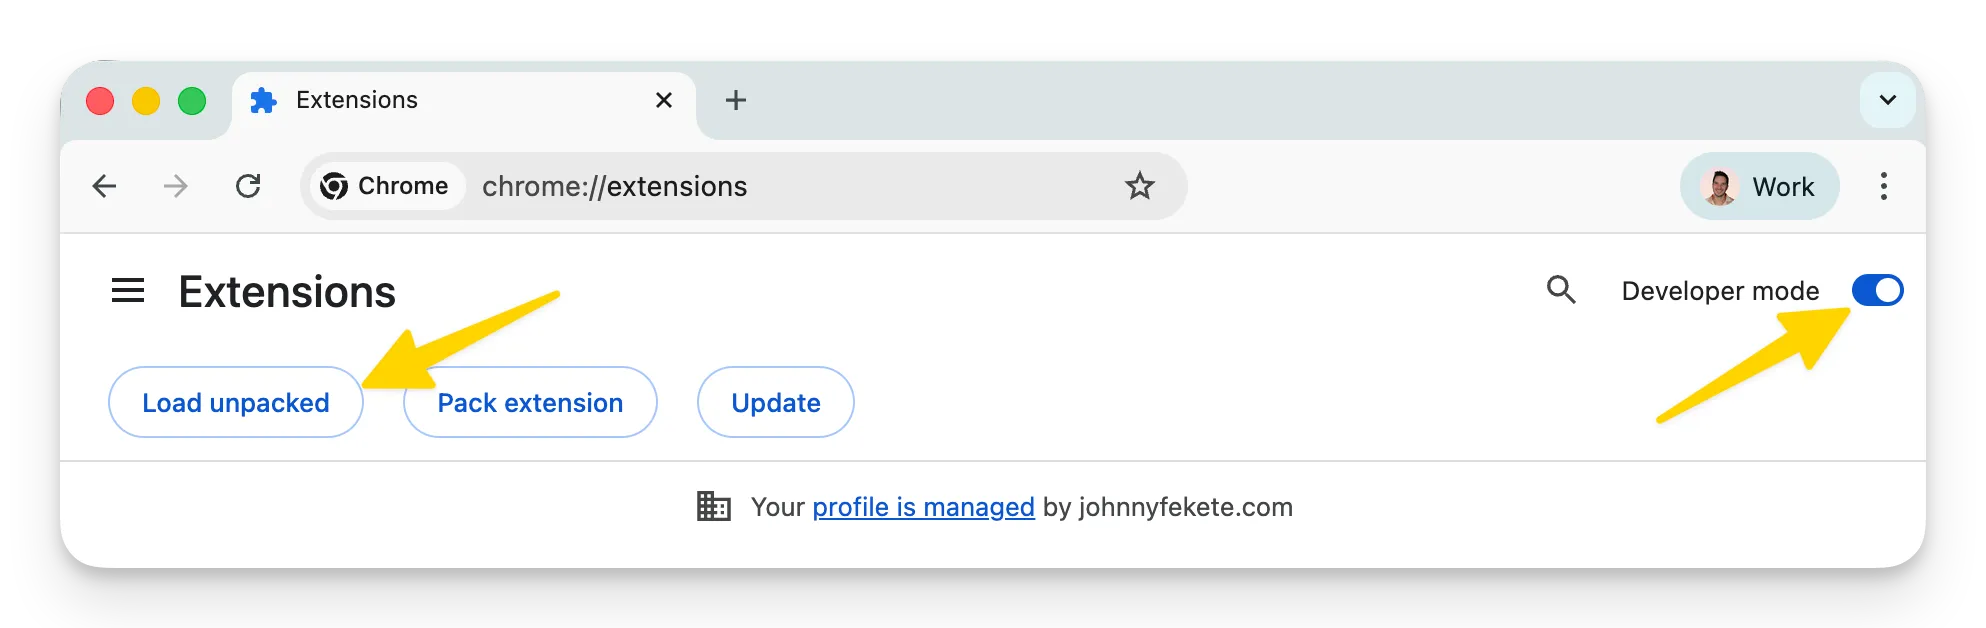
Enable Developer Mode
- Navigate to
chrome://extensionsin your browser - Toggle Developer mode (top-right corner)
- Click Load unpacked
- Select your project folder containing
manifest.json
Your extension now appears in the extensions list with:
- Name and description from manifest
- Version number
- Auto-generated extension ID
- Default Chrome icon (we’ll customize this later)
Testing the Popup
Click the puzzle icon in Chrome’s toolbar and pin your extension. Clicking the extension icon opens your popup displaying “TabNotes”.
Congratulations! You’ve created a working Chrome extension.
Implementing Background Scripts
Popups are great for UI, but extensions need to respond to browser events even when the popup is closed. Background scripts (service workers) handle this.
Adding Background Script Configuration
Update manifest.json to register a background script:
// manifest.json
{
  "manifest_version": 3,
  "name": "TabNotes",
  "version": "1.0.0",
  "description": "A simple Chrome extension with a popup",
  "action": {
    "default_popup": "popup.html"
  },
  "background": {
    "service_worker": "background.js"
  },
  "permissions": ["tabs"]
}
Creating the Background Script
Create background.js to monitor tab changes:
// background.js
chrome.tabs.onActivated.addListener(async (activeInfo) => {
  const tab = await chrome.tabs.get(activeInfo.tabId);
  console.log('Tab activated:', tab);
});
What This Does:
chrome.tabs.onActivated- Event fired when user switches tabsactiveInfo.tabId- ID of the newly activated tabchrome.tabs.get()- Retrieves full tab details (URL, title, etc.)
Don’t worry about memorizing the API syntax - we’ll explore tabs API thoroughly in Lesson 8.
Understanding Permissions
Extensions must explicitly request permissions for sensitive operations. The tabs permission allows access to tab information.
Why Permissions Matter
When users install your extension, Chrome displays requested permissions. Users can reject installations if permissions seem excessive for the extension’s purpose.
Best Practice: Request only the minimum permissions needed. For TabNotes, we only need tabs - not activeTab, history, or other tab-related permissions.
Viewing Requested Permissions
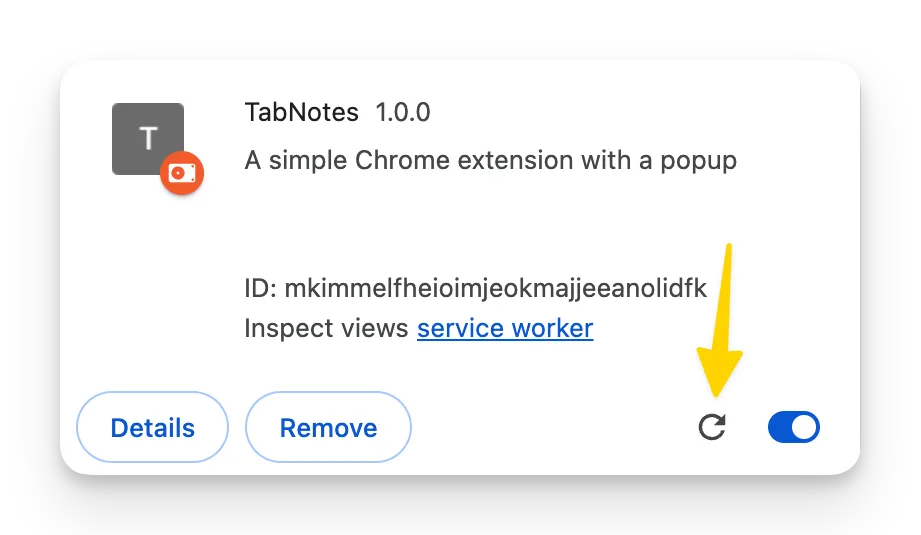
After updating the manifest:
- Click the reload icon in
chrome://extensions - Click Details on your extension
- View Permissions section
Chrome translates technical permissions into user-friendly descriptions like “Read your browsing history.”
Debugging Extensions
Debugging Background Scripts
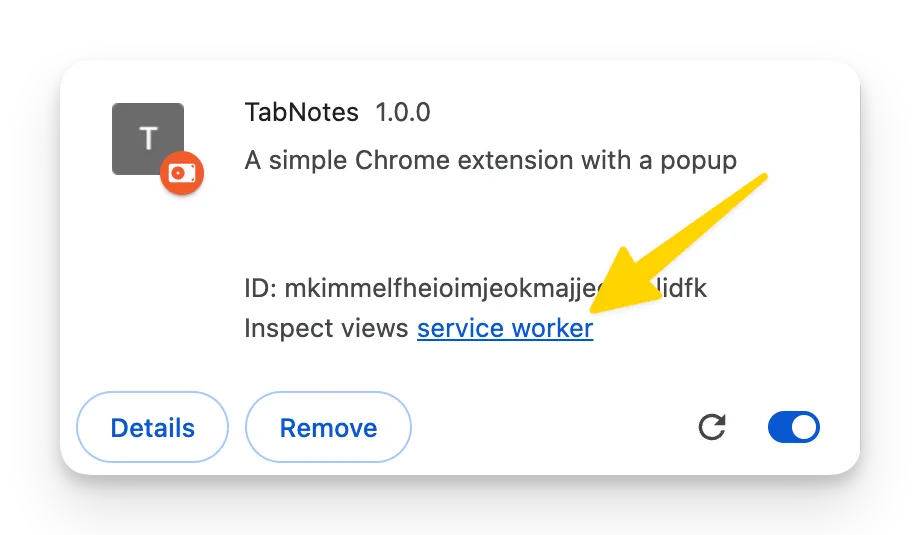
Background scripts run independently of any visible UI:
- In
chrome://extensions, click Inspect service worker under your extension - DevTools opens showing console output from
background.js - Switch between tabs in Chrome
- Watch console log each tab activation with full tab details
Pro Tip: Service workers can “go inactive” after inactivity. If DevTools shows “inactive,” simply trigger an event (switch tabs) to wake it.
Debugging Popups
Popup debugging works like regular webpage debugging:
- Open your extension popup
- Right-click inside the popup
- Select Inspect
- DevTools opens inspecting
chrome-extension://[ID]/popup.html
You can modify HTML, test CSS, and debug JavaScript just like a normal webpage.
Development Workflow Challenges
You’ve now experienced the core extension development workflow, but several pain points should be obvious:
Manual Reloading
Every code change requires:
- Saving files
- Clicking reload in
chrome://extensions - Reopening popup/DevTools
This becomes tedious quickly during active development.
Chrome-Specific Code
Notice chrome.tabs.onActivated - this code only works in Chrome. Firefox uses browser.tabs.onActivated. Writing cross-browser extensions requires:
- Separate code paths for each browser
- Conditional API usage
- Different build outputs
No Build Pipeline
Modern web development includes:
- TypeScript compilation
- CSS preprocessing
- Module bundling
- Hot module reloading
Vanilla extension development lacks these conveniences.
Chrome Extension Documentation
Before moving forward, familiarize yourself with Chrome’s official docs at developer.chrome.com/docs/extensions:
Key Sections:
- Get Started - Tutorial and overview
- API Reference - Complete API documentation (tabs, storage, runtime, etc.)
- Manifest V3 - Configuration options
- Samples - Example extensions with source code on GitHub
Example: Search “cookies” to find the Cookie Clearer sample with complete source code.
These docs are authoritative and comprehensive - use them whenever you need API details beyond this course.
What’s Next
You’ve built a functioning extension with a popup and background script. The extension works, but the development experience is suboptimal.
Lesson 3 introduces WXT - a modern framework that eliminates manual reloading, handles cross-browser compatibility automatically, and provides TypeScript support, hot reloading, and production builds out of the box.
We’ll rebuild this exact extension using WXT and experience the difference modern tooling makes.